.avif)
How to Upload CSV Files to Sales Navigator: The Definitive Guide

.avif)
Why CSV Uploads Are Key to ABM
The Power of Account-Based Marketing
Any ABM strategy involves building lists of target accounts, and then identifying the right decision-makers within each company.
This two-step approach (companies first, people second) has a key advantage: it ensures that the prospects you reach out to belong to companies that have already been vetted and meet the criteria to become potential customers of your product or service. If you offer a fast delivery service in Wisconsin, there’s no point in contacting companies based in Arizona. If your product is designed for SMBs, there’s no reason to target companies with more than 1,000 employees.
Moreover, working upstream on a well-defined account list makes it possible to rank those accounts. Several methodologies exist. One of them consists in extracting content from a company’s LinkedIn page (using a tool such as Icypeas’ Company Scraper) and/or from the homepage of its website (with tools like Firecrawl), and then asking an AI to analyze these text snippets and assign each company a score based on how closely it matches your ICP. Focusing on specific high-value accounts increases ROI compared to broad prospecting.
Speed & Scale
LinkedIn Sales Navigator is often a central tool in a sales team's tech stack. As you may have noticed, Sales Navigator allows you to search for accounts individually and save them to build lists. However, this amounts to a rather tedious "cherry-picking" process. Very quickly - if your market includes more than fifty accounts - creating these lists becomes a total nightmare.
This is why LinkedIn introduced a feature that allows you to upload CSV files into Sales Navigator and build your account lists more quickly.
The "Context" Advantage
Easily creating account lists in Sales Navigator allows you to fully leverage the “Context Advantage.”
In the world of Account-Based Marketing, Context Advantage is the strategic edge gained by having relevant, actionable information about a prospect before you engage with them.
When you upload a CSV of accounts, you aren't just looking for random companies; you are looking for companies that match a specific intent or criteria (e.g., companies that just raised Series B, or companies using a specific tech stack). You know why you are targeting them. This allows you to tailor your message to their specific industry or growth stage. It allows for more personalized outreach, at the account level.
The Prerequisites: Which Sales Navigator plan do you actually need?
CSV Import Is A Reserved Feature For Higher-tier Sales Navigator Plans
The Sales Navigator subscription has 3 tiers: “Core” (formerly Professional), “Advanced” (formerly Team) and “Advanced Plus” (formerly Enterprise).
The CSV upload feature is not available on the “Core” plan.
"Advanced" and "Advanced Plus" are the only tiers with the "Upload from CSV" button.
As a reminder, here is the price of each plan (updated in January 2026):
- Core: $99
- Advanced: $169
- Advanced Plus: $189
How To Upgrade From Core To Advanced
If you are currently on the Core tier, you can upgrade it to the Advanced tier by following the steps below:
1. Log in to your LinkedIn account.
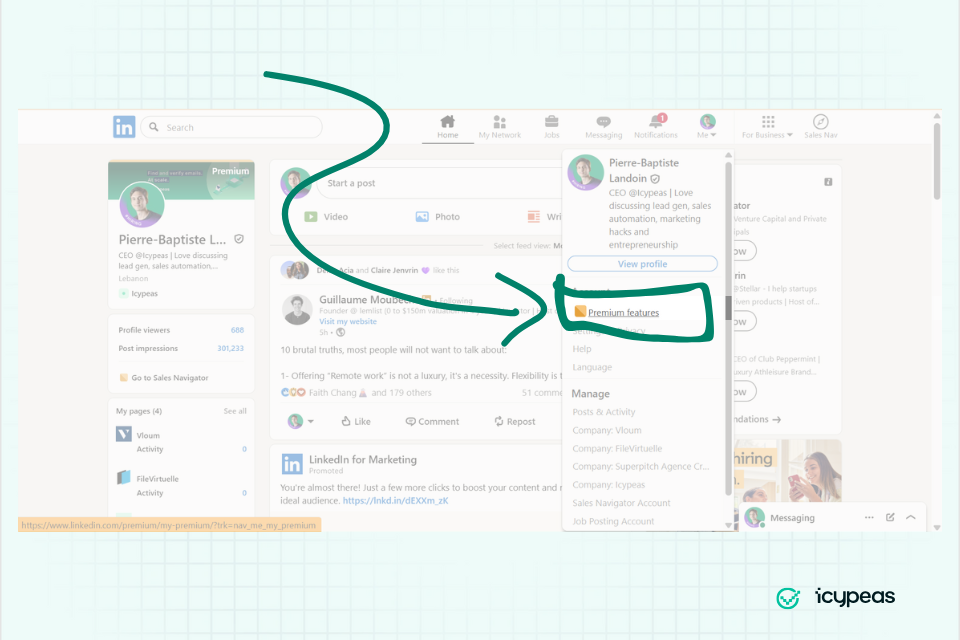
2. Click on the "Me" icon (your profile picture) in the top navigation bar.
3. From the dropdown menu, select "Premium features":
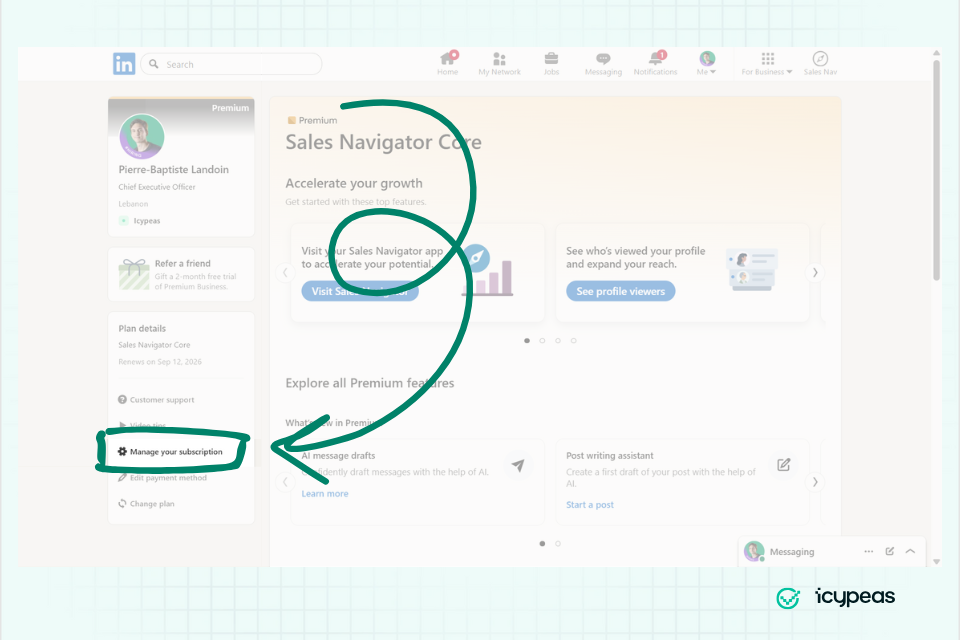
4. Click "Manage your subscription":
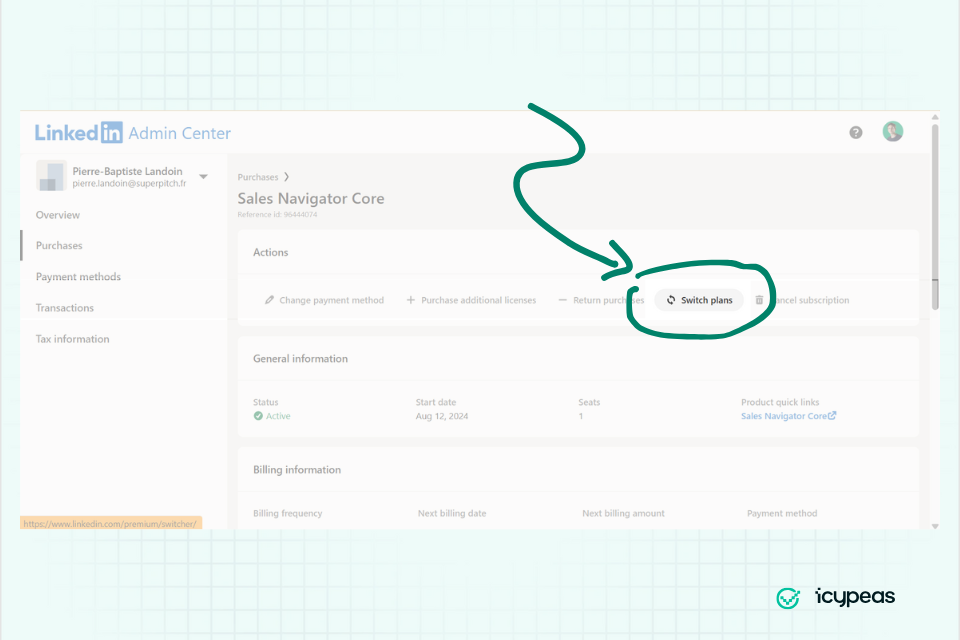
5. Select "Switch plans":
6. Click "Upgrade plan" under "Sales Navigator Advanced":
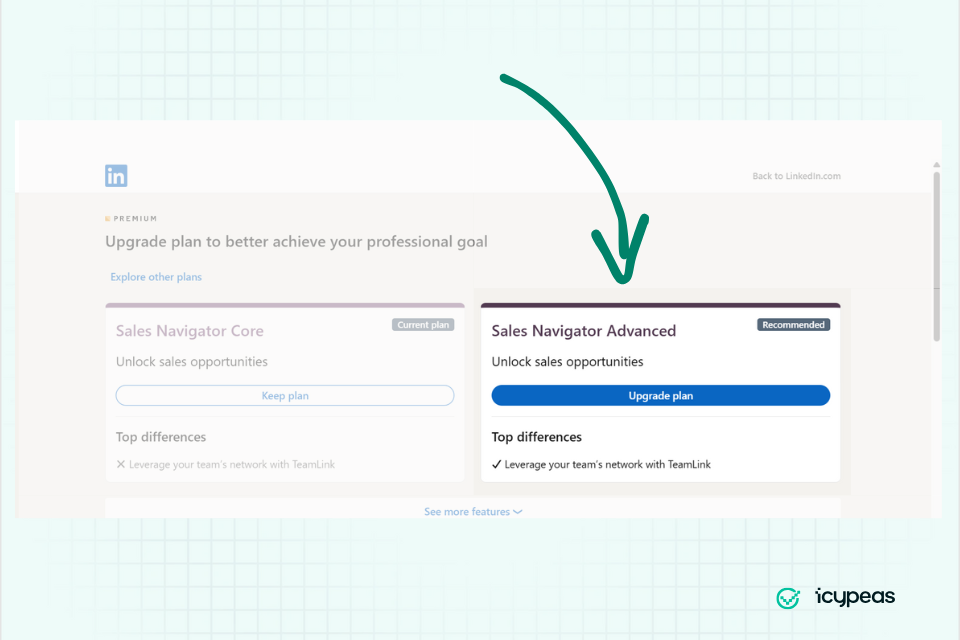
If you want to subscribe to Sales Navigator Advanced Plus, click on "See more features" and then select "Sales Navigator Advanced Plus". This plan is designed for enterprise-level sales organizations and Sales Operations (SalesOps) teams that need a deep bridge between LinkedIn and their internal systems (CRM integrations) as well as team management capabilities.
The Step-by-Step Process To Upload CSV Files To Sales Navigator
The Detailed Tutorial
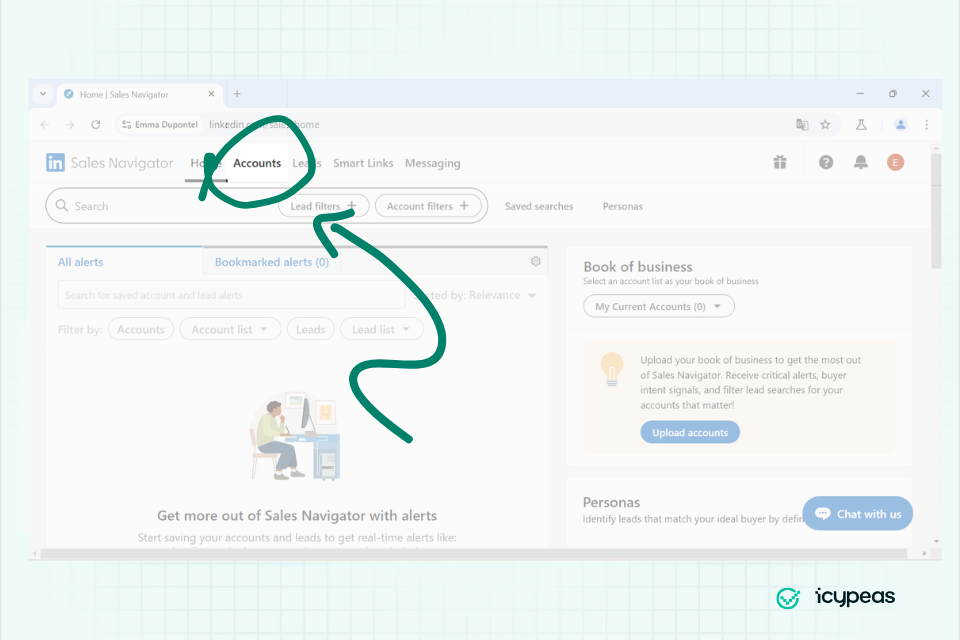
We will go through this click path, step by step: Accounts > Account list > Create an account list > Upload an Account from CSV.
1. Load Sales Navigator (https://www.linkedin.com/sales/home) and click the "Accounts" tab:
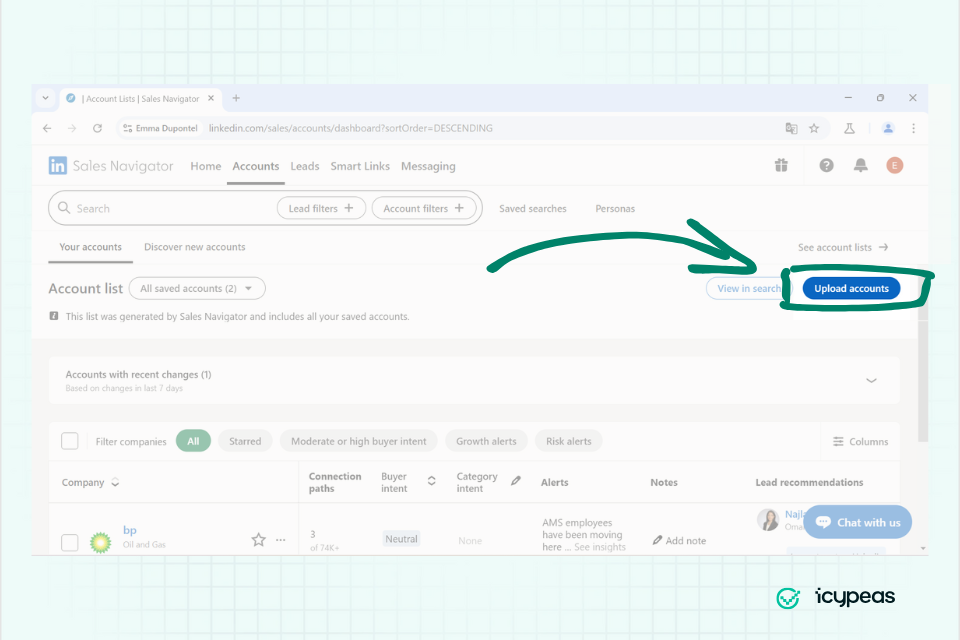
2. Click the "Upload accounts" button:
3. A pop-up window appears with recommendations on how to format your CSV file. Click on "Continue".
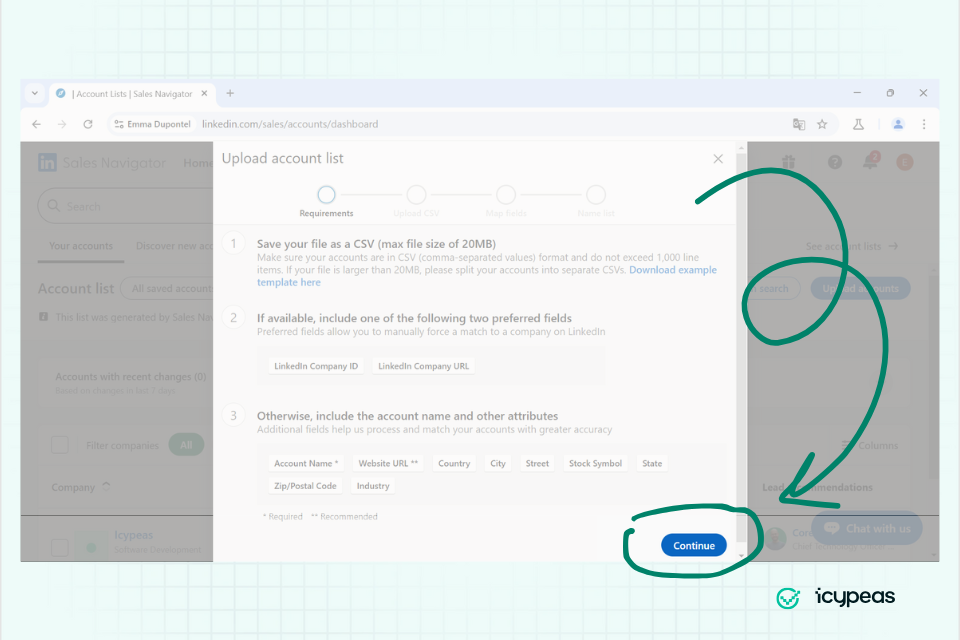
4. Drag and drop your CSV file (or click the drop zone to open your file explorer):

Your uploaded CSV should not exceed 1,000 rows and 20 MB.
5. Map the columns in your CSV file to Linkedin categories:

6. Give your import a name and click "Finish":
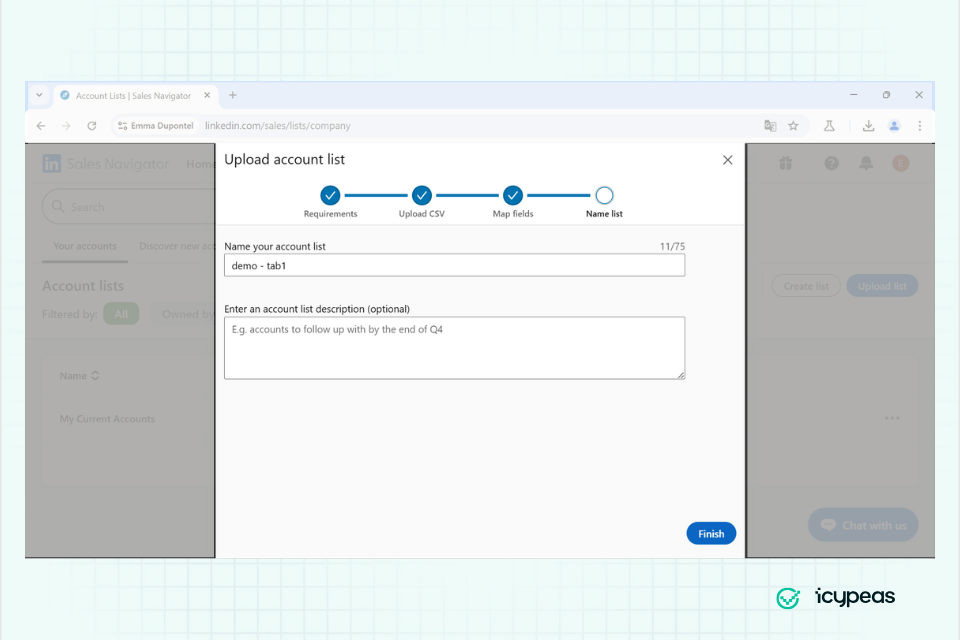
Your import might take up to 15 minutes if your file has 1000 rows (the maximum number of rows).
7. Once the import is complete, you can see the account list here:
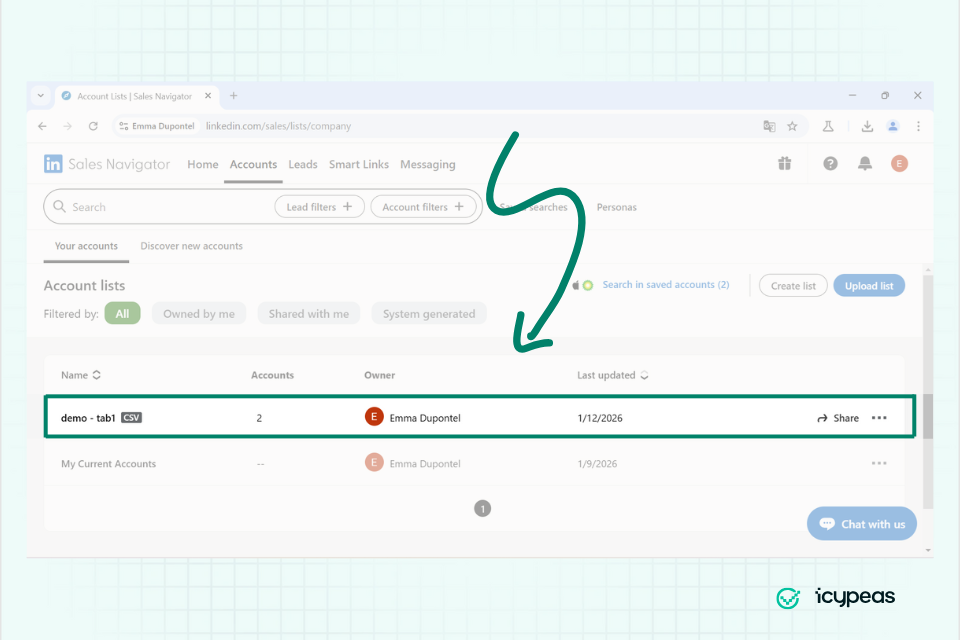
By clicking the three dots, you can manage the list: "download the match report", "make a copy", "view list info" or "delete the list".
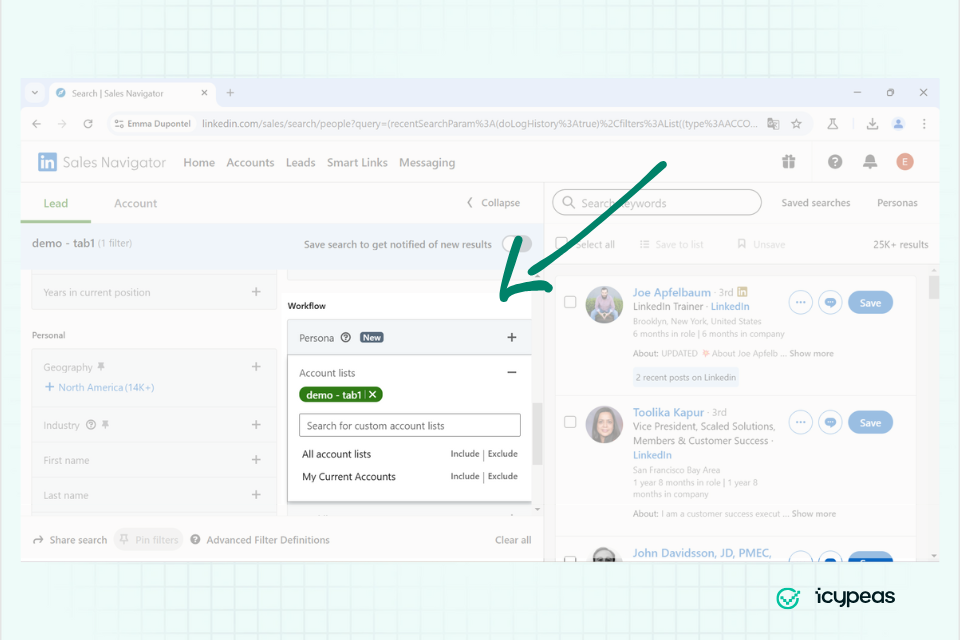
8. You can now search for leads (individuals) using the Account lists filter to limit the search to a specific list of accounts:
Maximizing the Match Rate
You will quickly notice that LinkedIn’s matching process can be a bit hit-or-miss when importing a CSV. This often leads to inaccuracies that can clutter your lists.
To ensure your data remains clean and precise, follow these guidelines:
1️⃣ Leverage Data Hierarchy: LinkedIn prioritizes data points in a specific order:
➔ LinkedIn Company URL > Company Website > Company Name.
2️⃣ The golden rule: If you have the LinkedIn Company URLs, upload those alongside the Company Names (which are mandatory) and exclude everything else—no websites, no addresses. The LinkedIn Company URL is the most reliable "matching key" available; focusing on it alone prevents the system from getting confused by conflicting data.
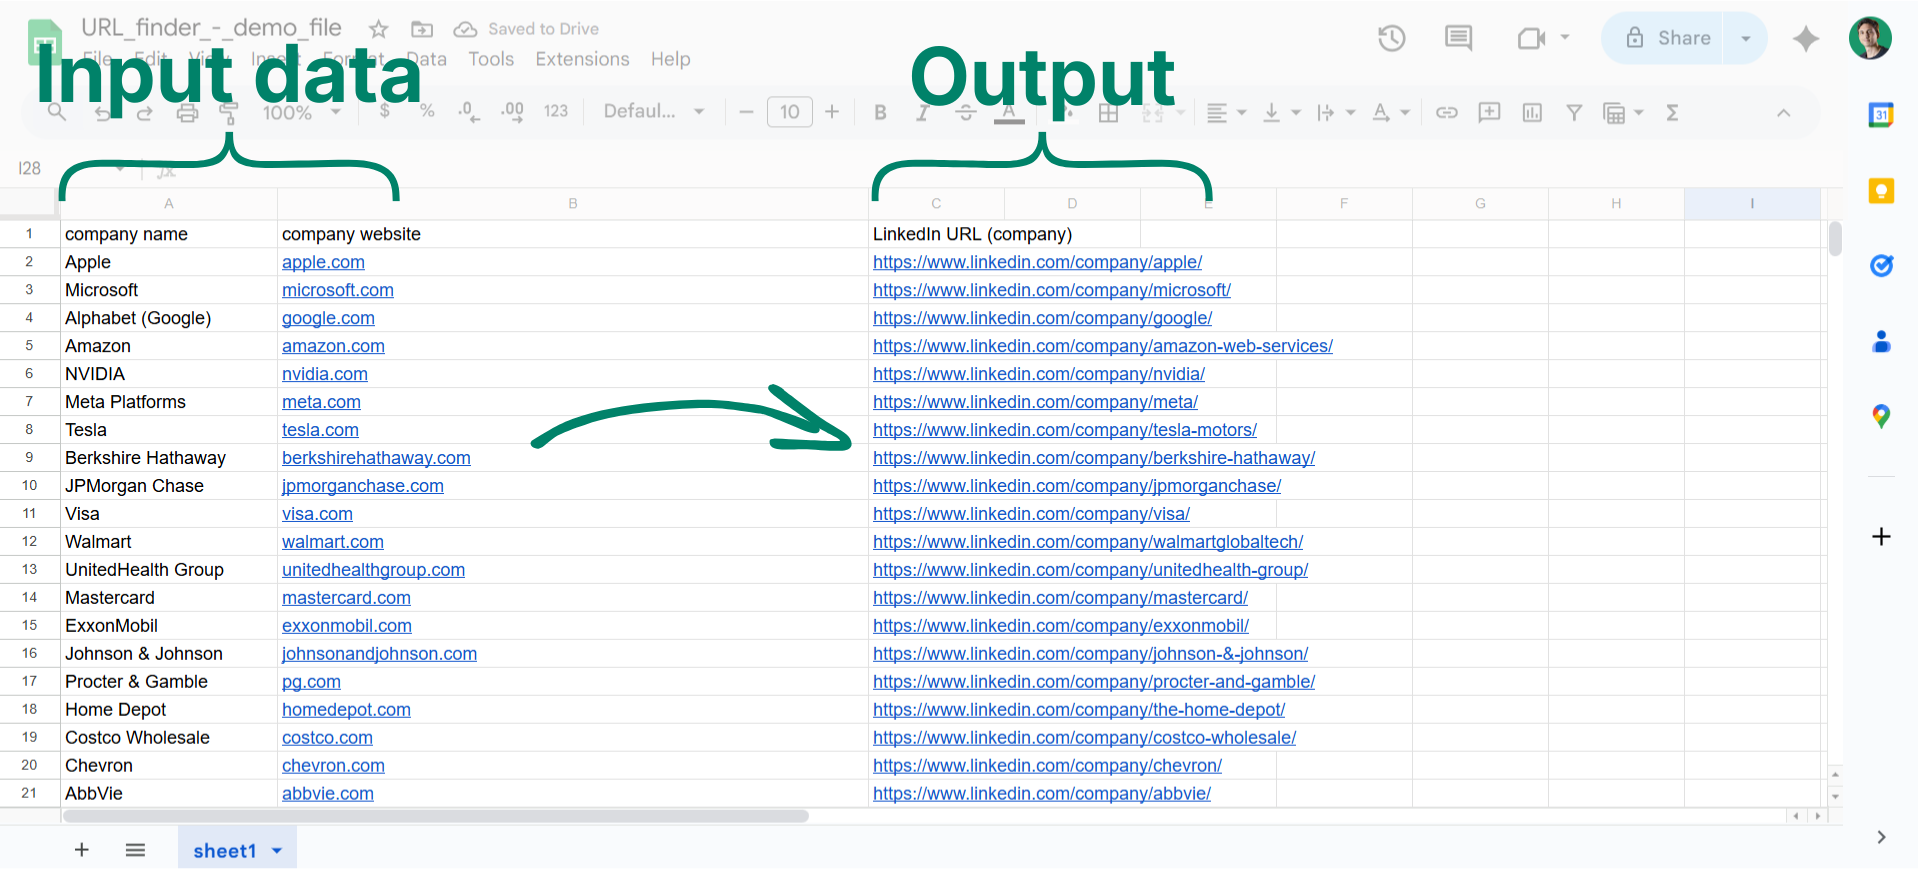
How to Find LinkedIn Company URLs
Most initial files contain a Company Name or Website but rarely the specific LinkedIn URL. You will need to "enrich" your data with these URLs before importing.
Method 1: Using SERP (Search Engine Results Pages)
If you have some coding knowledge, you can automate a search on Google or Bing using the following query:
{Company Name or Company Website} site:linkedin.com
Generally, the top result will be the correct LinkedIn company page.
%20(1).png)
Services such as Serper.dev or SerpApi allow you to retrieve search engine results with ease. They handle the heavy lifting by abstracting the complexities of bypassing Google and Bing’s anti-bot protections.
Important Caveat: This method is not foolproof. In roughly 35–40% of cases, the top result is not actually the company’s LinkedIn page. To solve this, you will need to analyze the entire results page by parsing every text snippet.
Once you have retrieved the search snippets, you can re-rank them using an LTR algorithm to find the correct match:
- LambdaMART: A fast, reliable option, though it is considered a more traditional approach.
- Deep Learning Models: These are more computationally intensive but offer significantly higher accuracy for complex matching.
Method 2 (The Simple Way): Using a Dedicated Service
Several tools allow you to find a LinkedIn Company URL using just a name or website. Whenever possible, use the company website, as it eliminates the risk of errors caused by companies with identical names.
Be aware that some services accept a website and return the full contents of the LinkedIn page. You generally want to avoid these for this specific task; they provide far more data than you need (you only need the URL) and are significantly more expensive.
Market Overview:
The price per credit was calculated based on a 10K credit purchase.
We tested the coverage and accuracy of these 3 services by submitting a list of 50 company websites (small and large, across various nationalities). Here are the results:
As the data shows, Icypeas stands out as the most cost-effective solution, offering the best combination of database coverage and accuracy.
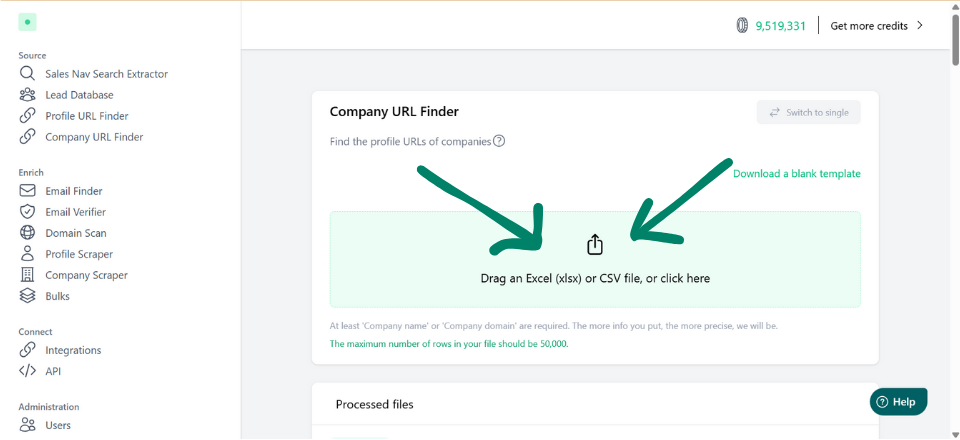
The following tutorial will show you how to use Icypeas to enrich your files with LinkedIn Company URLs.
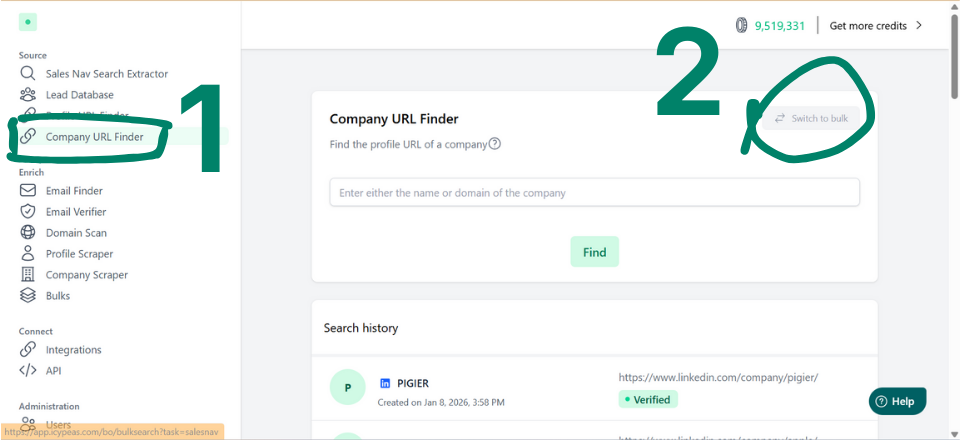
Sign-in to your Icypeas account, click "Company URL Finder" in the vertical menu on the left, and then click "Switch to bulk":
Upload a CSV file with 2 columns: "Company names" & "Company websites".
Match your columns to Icypeas categories:

The processing of the file is almost instant. A file of 10K rows requires just a few seconds to be processed entirely.
Company URL vs. Company ID: Which is better?
Sales Navigator allows you to upload the LinkedIn Company ID instead of the URL. The ID is an immutable (unchanging) identifier, whereas the URL can be customized or changed (e.g., following a rebrand). This makes the ID more "future-proof."
However, while switching from a website to a Company URL makes a massive difference in match rates, converting a URL to an ID is more of a micro-optimization. It won't drastically change your success rate today, but it is more stable for the long term.
If you want to convert your URLs to IDs, Icypeas can handle this as well. Its "Company Scraper" feature extracts the full profile data, which includes the unique Company ID.
Cleaning Your Company Names
If you are unable to retrieve a LinkedIn URL, ID, or even a website, your last line of defense is cleaning your company names.
Remove legal suffixes such as "LLC," "SA," or "Corp," and strip out any emojis. This prevents Sales Navigator from getting "tripped up" by extra text and following false leads during the matching process.
Troubleshooting: Why didn't my companies match?
Analyzing Results: How To Interpret The Report
Once the upload is complete, LinkedIn provides a summary report. Many users ignore this, but it’s the "health check" for your lead gen data.
Click on the three dots at the right side of the file name, and then click “Download match report”:

When you open it, you see that Sales Navigator has added 8 new columns:
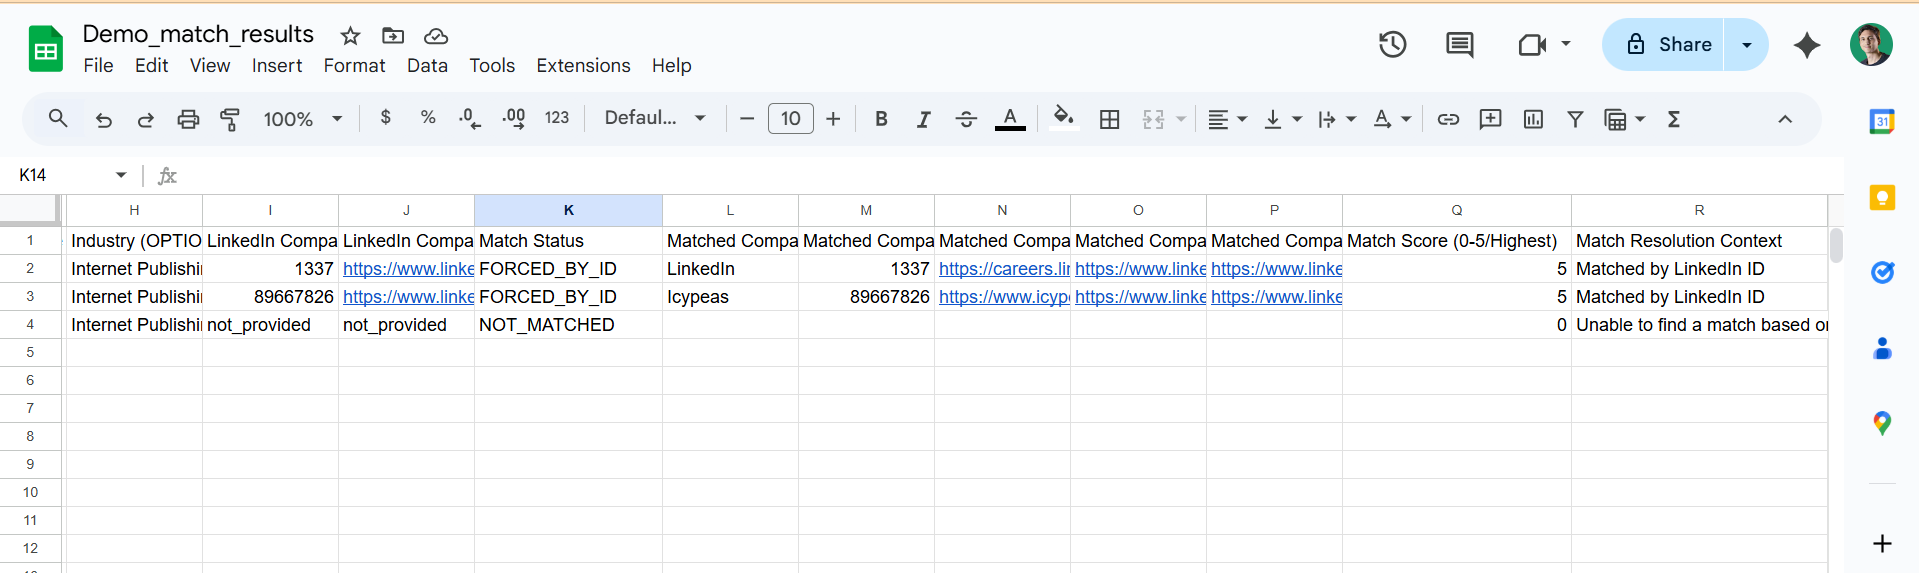
➤ The "Match Score": between 0 and 5. Anything below 2 should be removed from your account lists.
➤ The "Match Status" and “Match Resolution Context columns”: here you can see what Sales Navigator used as the key matching datapoint. Crucial tip: just because it's matched doesn't mean it's correct. We advise you to click into the list and spot-check the first 10 entries to ensure they look right.
➤ The "Not Matched" Category: These are the rows LinkedIn completely ignored. This happens when the data is too thin (e.g., just "Smith & Co" with no website or city).
If the "Not Matched" number is high, you must understand why. These are the common technical and logical culprits:
1. The "Digital Ghost" Problem
The company might exist in the real world, but they don't have a LinkedIn Company Page. LinkedIn cannot match a CSV row to a company that hasn't created a page yet.
2. URL Formatting Errors
This is the #1 technical reason for failure.
- The "HTTP" Trap: LinkedIn sometimes rejects http:// links in favor of https://.
- The "Sales Nav URL" Mistake: Users often paste the Sales Navigator link (which starts with linkedin.com/sales/company...). LinkedIn's uploader requires the Public URL (which starts with linkedin.com/company/...).
3. Data Over-Cleaning
If a user removes "Inc," "Ltd," or "GmbH" from the company name thinking they are helping, they might actually be hurting the algorithm. LinkedIn’s search is "fuzzy," but specific legal identifiers sometimes help it distinguish between "Target" (the retailer) and "Target" (the small marketing agency).
4. Special Characters & Encoding
If the CSV contains non-English characters (like ñ, ö, or é) but wasn't saved in UTF-8 encoding, the names will look like gibberish to the uploader (e.g., "Mller" instead of "Müller").
5. The "Brand vs. Legal Name" Conflict
A company might be known as "Blue Bottle Coffee" (Brand), but their LinkedIn page is registered as "Nestlé" (Parent). If the CSV uses the brand name and the website is a redirect, the match fails.
The "Lead Import" Problem
Why Importing Leads Matters
You might wonder: is it possible to import leads as well as accounts? The answer is no. Linkedin does not allow direct lead (individual person) imports. You can only import accounts/companies.
Of course, using the account list upload feature, you can do the following workflow: import account lists → Go to Lead Search → Filter by "Account List" → Filter by Job Title → Hand pick leads and save them one by one into a Lead list. That’s tedious. That does not scale.
However, having the ability to import leads can sometimes be very useful—especially to define exclusion rules. For example: “I want all developers at Apple, except for the following 150 people.”
That’s why, under certain circumstances, you might be interested in an alternative solution to Sales Navigator.
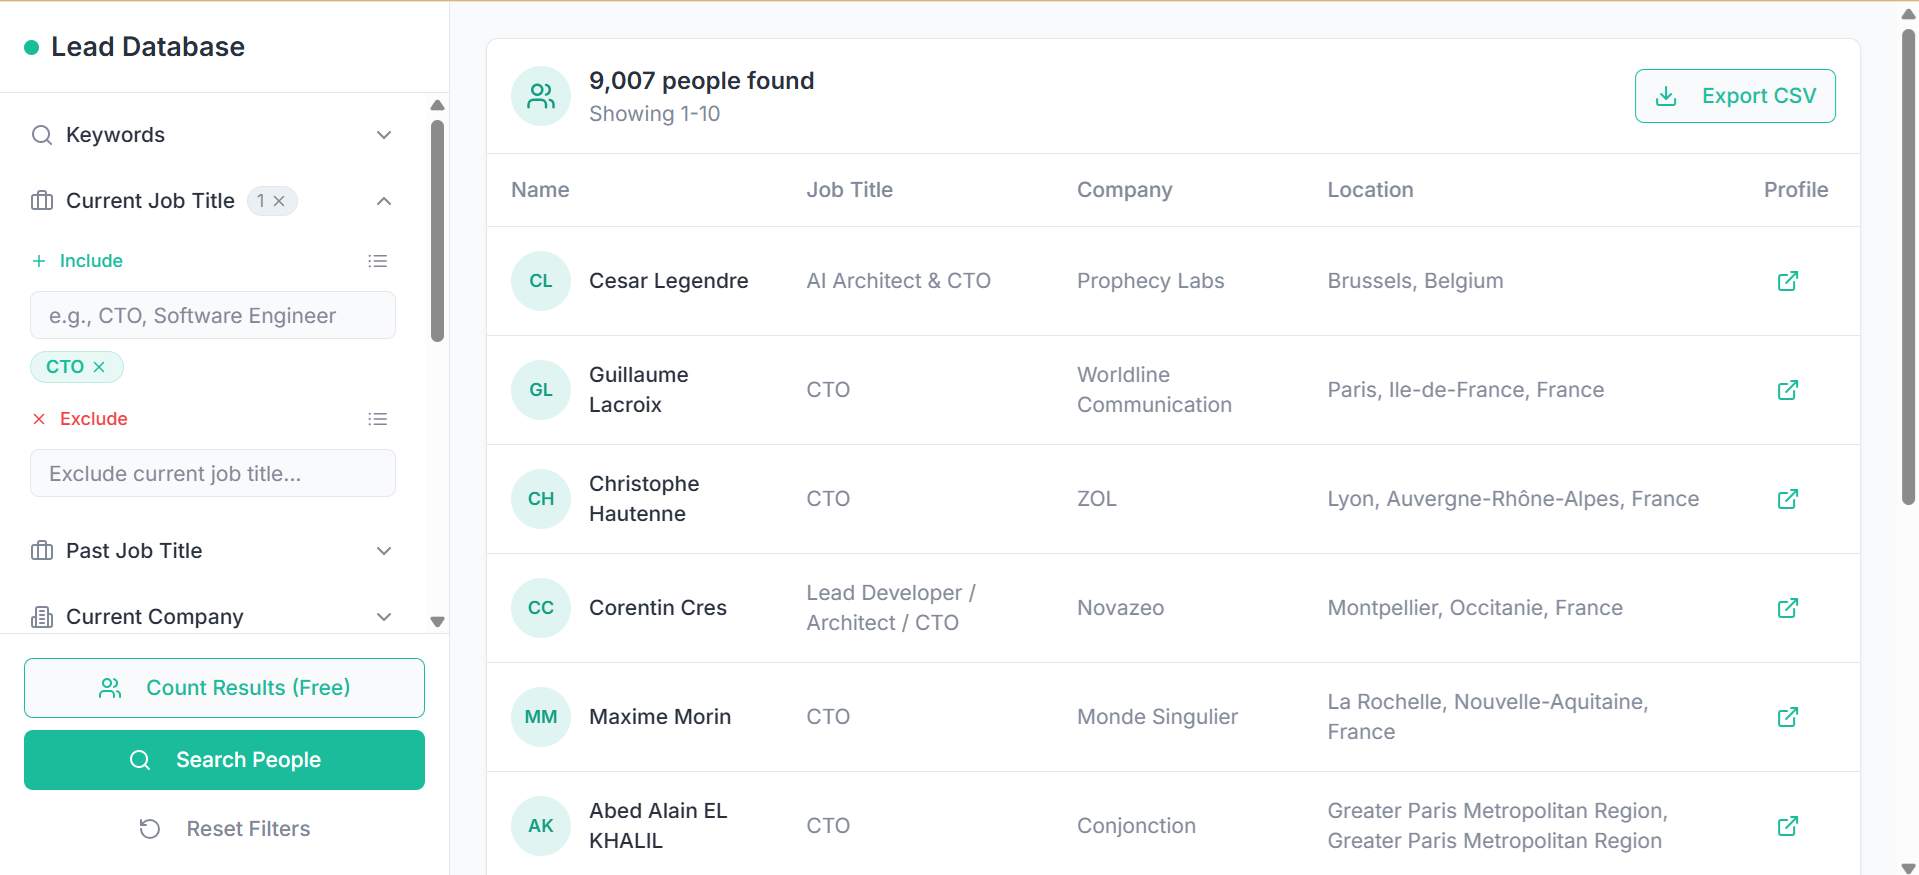
Icypeas offers you a Lead Database where you can find leads, using search filters such as job titles, companies, company headcount, location, and more.
Unlike Sales Navigator, Icypeas allows you to import a list of leads for inclusion or exclusion. This imported list can have up to 200 leads.
By contrast with Sales Navigator, Icypeas brings several advantages:
- You can easily export lead and account lists outside of Icypeas, whereas Sales Navigator has no native export feature and requires you to use a scraper.
- With Icypeas, you can browse an unlimited number of results for any given search, whereas Sales Navigator caps the number of leads you can browse to 2500 per search.
- With Icypeas, you don’t put your Linkedin account at risk of being banned.
How to Find People With Icypeas Lead Database
The Icypeas Lead Database is a handy and cost-effective way to source leads.
It offers more than 20 different filters in total (for people and companies). It is designed to let you easily export large lists of companies and people.
.png)
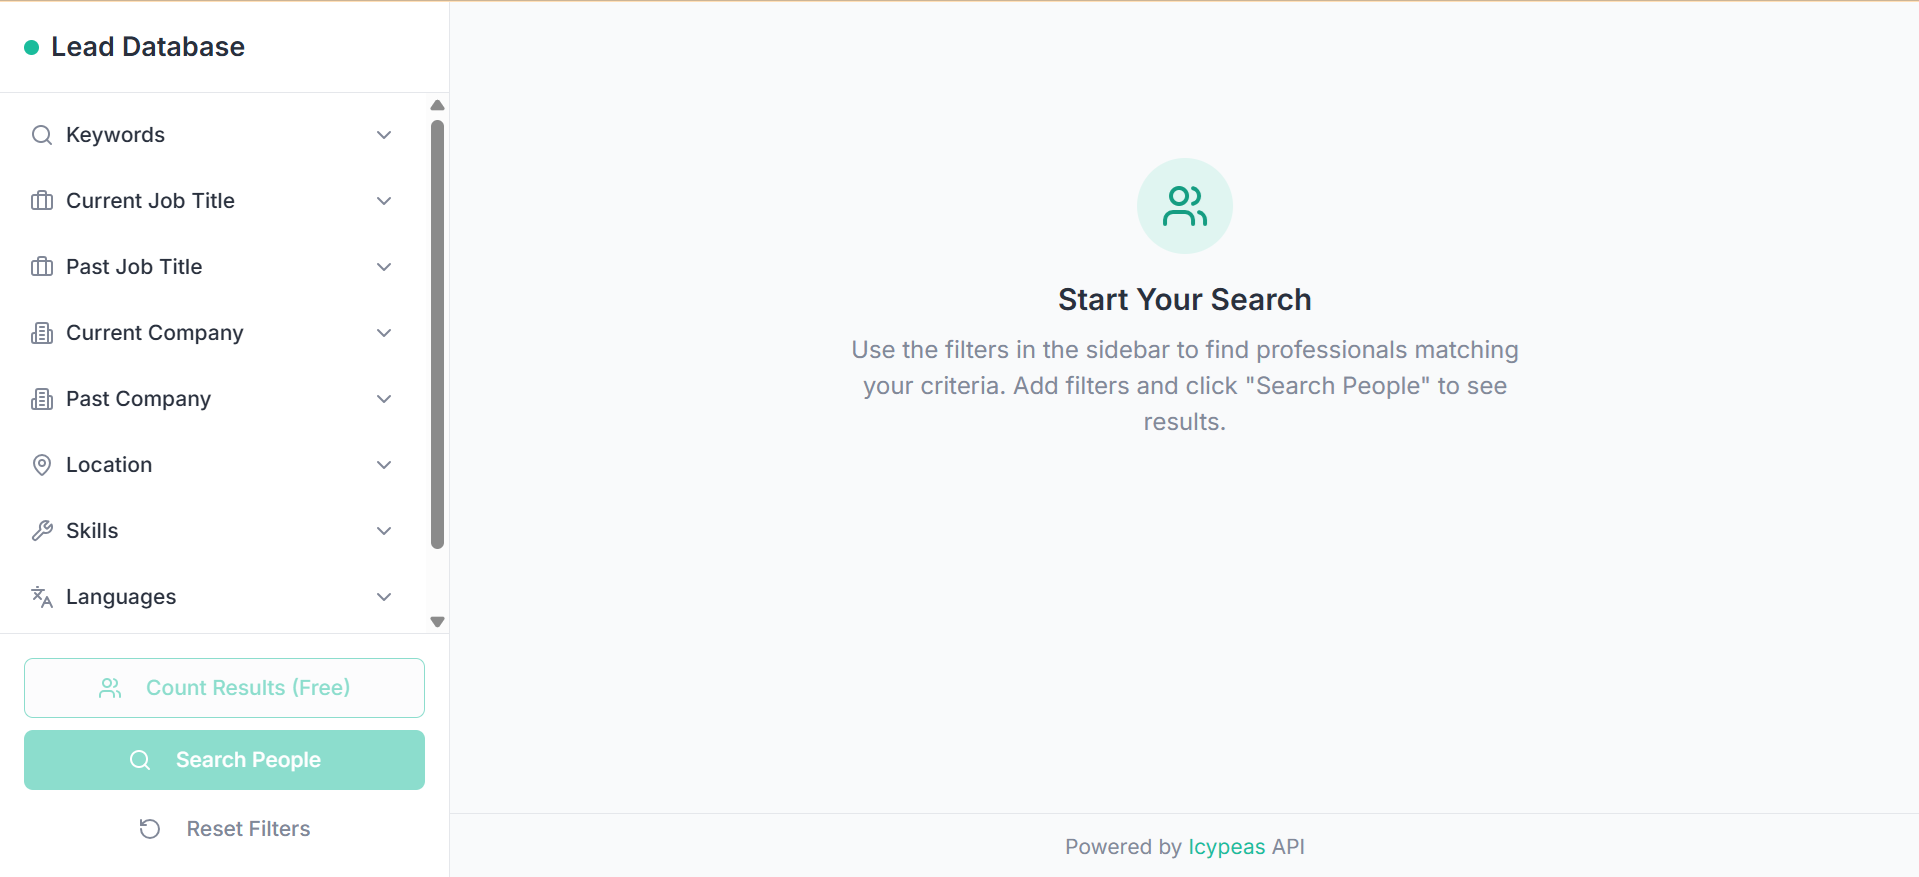
Let's see how to use it in 4 practical steps how to query this database.
Step 1: use the search filters. Each filter can be filled with items for inclusion and/or exclusion. Each filter can have up to 200 items. A typical search will include a list of job titles and a list of companies. The keyword field allows you to search for a specific keyword (or a list of keywords) across the whole profile.
Step 2: browse the results. If necessary, iterate with the filters to narrow down or enlarge your search.
Step 3: export the results.
Step 4: use our email finder feature to enrich your lead list with emails.
Also, you can query this database programmatically, through the Icypeas API. See the documentation here.
Comparison of Third-Party Lead Databases
If you’re looking for more ease-of-use and import/export capabilities, these lead databases are potential alternatives to Sales Navigator that you should explore:
🔑 If you want to give Icypeas a try, you can sign up here.

.webp)